
Networking Throttle in Playwright
Preface
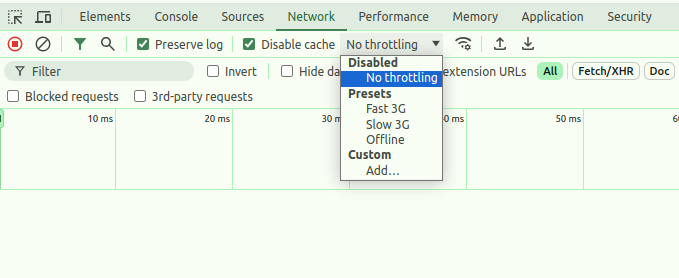
In today’s world of zippy internet, web application network speed might seem like an afterthought. But for applications reaching users globally, testing performance across varying network conditions becomes crucial. Probably you all are familiar how to throttle the network in the browser. Using the DevTools, you can easily simulate different network conditions.
But what if you want to do it programmatically?
I am going to show you how to do it using Playwright.
Selective Throttling
Let’s imagine you have an application that aggregates data from different sources. You want to test how your application behaves when one of the sources is slow. It’s easy to implement.
const DELAY_MS = 5_000;

test.describe('Network Throttle with delay', () => {
  test('defer particular requests with predefined time', async ({ page }) => {
    await page.route('todomvc/js/*.js', async route => {
      await new Promise(resolve => setTimeout(resolve, DELAY_MS));
      await route.continue();
    });

    await page.goto('/todomvc');
    await page.waitForLoadState('domcontentloaded');
  });
})
In this example, we defer all requests to the todomvc/js/*.js endpoints by 5 seconds. In the same time, other requests will be processed as usual.
Now let’s move on to the more interesting part.
Chrome DevTools Protocol
Playwright uses the Chrome DevTools Protocol (CDP) under the hood to communicate with the browser. CDP is the low-level debugging protocol used by the Chrome DevTools. It allows you to control the browser, inspect the DOM, debug JavaScript, and more.
You can check out the Chrome DevTools Protocol to see all the available commands.
What we are interested in is the Network domain. Network domain allows tracking network activities of the page. It exposes information about http, file, data and other requests and responses, their headers, bodies, timing, etc.
And as you can see, it also has a method called Network.emulateNetworkConditions which allows you to emulate network conditions.
Warning: Everything I am going to show you will work only in Chromium-based browsers. It includes Chrome, Edge, mobile versions of these browsers, etc. It will not work in Firefox or WebKit.
Emulating Network Conditions
So, we have a method which allows us to emulate network conditions. But how do we use it? Where do we send this command? Thanks to Playwright, we can easily send CDP commands to the browser using CDPSession (Playwright API).
Before we start coding, let’s define what we want to achieve. We want to throttle the network to 2G,3G,4G and some other speeds and check how much time it takes to load a page and perform particular action.
First of all, as you can see, we have to provide such required parameters to the Network.emulateNetworkConditions method.
offline: True to emulate internet disconnection.latency: Minimum latency from request sent to response headers received (ms).downloadThroughput: Maximal aggregated download throughput (bytes/sec). -1 disables download throttling.uploadThroughput: Maximal aggregated upload throughput (bytes/sec). -1 disables upload throttling.
I think we can also use one optional parameter connectionType which can be one of the following: none, cellular2g, cellular3g, cellular4g, bluetooth, ethernet, wifi, wimax, other.
So, what values should we provide for these parameters? Actually, these values can vary depending on many factors.
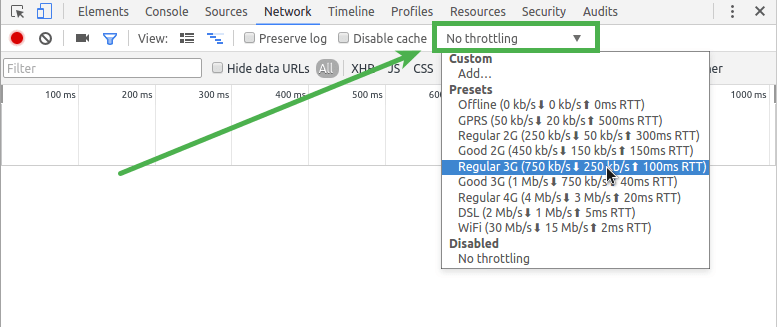
So, by doing some research, I found this StackOverflow post where the user provides the following devtools screenshot: It’s a bit old, but I think it is still more or less relevant.
If you are interested in the most recent values for Chrome DevTools, you can check out the source code.
Let’s create a dictionary with some of these values.
export const NETWORK_PRESETS = {
    Offline: {
        offline: true,
        downloadThroughput: 0,
        uploadThroughput: 0,
        latency: 0,
        connectionType: 'none',
    },
    NoThrottle: {
        offline: false,
        downloadThroughput: -1,
        uploadThroughput: -1,
        latency: 0,
    },
    Regular2G: {
        offline: false,
        downloadThroughput: (250 * 1024) / 8,
        uploadThroughput: (50 * 1024) / 8,
        latency: 300,
        connectionType: 'cellular2g',
    },
    Good2G: {
        offline: false,
        downloadThroughput: (450 * 1024) / 8,
        uploadThroughput: (150 * 1024) / 8,
        latency: 150,
        connectionType: 'cellular2g',
    },
    Regular3G: {
        offline: false,
        downloadThroughput: (750 * 1024) / 8,
        uploadThroughput: (250 * 1024) / 8,
        latency: 100,
        connectionType: 'cellular3g',
    },
    Good3G: {
        offline: false,
        downloadThroughput: (1.5 * 1024 * 1024) / 8,
        uploadThroughput: (750 * 1024) / 8,
        latency: 40,
        connectionType: 'cellular3g',
    },
    Regular4G: {
        offline: false,
        downloadThroughput: (4 * 1024 * 1024) / 8,
        uploadThroughput: (3 * 1024 * 1024) / 8,
        latency: 20,
        connectionType: 'cellular4g',
    },
    WiFi: {
        offline: false,
        downloadThroughput: (30 * 1024 * 1024) / 8,
        uploadThroughput: (15 * 1024 * 1024) / 8,
        latency: 2,
        connectionType: 'wifi',
    }
};
So what we have for now:
- We know the CDP command we need to send to the browser.
- We know how to send this command using Playwright.
- We have a dictionary with some network presets we will use as parameters for the command.
I think that’s enough for the theory. Let’s move on to the practice and create simple test scenario.
Test Scenario
We will create a test that opens “Playwright TODO” application and adds a new todo item.
import { test, expect } from '@playwright/test';
import {NETWORK_PRESETS} from "../src/data/networkPresets";

test.describe.only('Network Throttle emulation', () => {
    for (const [name, value] of Object.entries(NETWORK_PRESETS)) {
    test(`emulate network throttle "${name}"`, async ({ context, page }) => {
      const cdpSession = await context.newCDPSession(page)
      await cdpSession.send('Network.emulateNetworkConditions', value)

      await page.goto('/todomvc');
      await page.waitForLoadState('domcontentloaded');

      await page.locator('.new-todo').fill("Network Throttle");
      await page.keyboard.press('Enter');
    });
    }

    test(`No throttle"`, async ({page }) => {
        await page.goto('/todomvc');
        await page.waitForLoadState('domcontentloaded');

        await page.locator('.new-todo').fill("Network Throttle");
        await page.keyboard.press('Enter');
    });
})
I use parametrized tests to run the same test scenario with different network presets. Also, I set the repeatEach option to 20, so we can see the difference
in the test duration.
You might wonder why I also added a test without any throttling. Well, I will show you later some interesting results.
Results
I ran the test on my local machine and here are the results of how much time (in milliseconds) it took to perform the test scenario with different network conditions:

Actually there is nothing surprising here. The slower the network, the longer it takes to perform the test scenario. But the goal is achieved. We can easily throttle the network using Playwright.
You can define timeouts for your tests to fail them if they take too long to execute.
Conclusion
Even though the network speed might seem like an afterthought, it is crucial to test your application under different network conditions. But in the same time, you should count the time needed to perform the tests. You don’t want to wait for hours to get the results. So, network throttling might be a good tool but use it wisely.
Bonus
In this section, I will show you some interesting results I got while running the test scenario with different network conditions.
Take a look at the following chart. It shows the difference in the test duration between the “No throttle” test and emulated “NoThrottle” preset test.
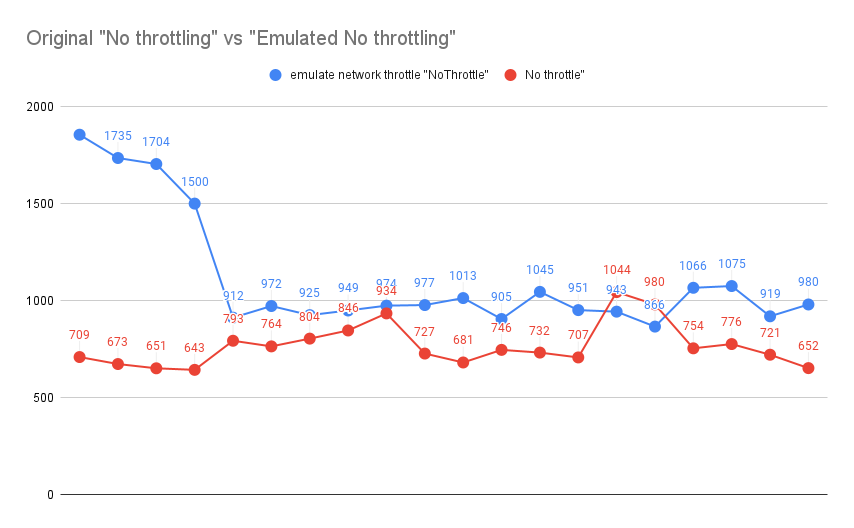
As you can see, “emulated” NoThrottle preset is slower than the “No throttle” test. And we can refer to the additional overhead of sending the CDP command. It takes some time to send the command and apply it to the browser.
Well, it could explain why the “No throttle” test is always faster than the “emulated” NoThrottle preset test (actually only particularly). But why three first “emulated” NoThrottle preset tests took much more time than all the others? I tried few times to run the tests and got the same situation.
I don’t have an answer to this question. If you have any ideas, please share them in our Telegram group.
And I’d like to show you one more interesting diagram. Take a look at the following chart. It shows the difference in the test duration between the “No throttle” test and emulated “WiFi” preset test.
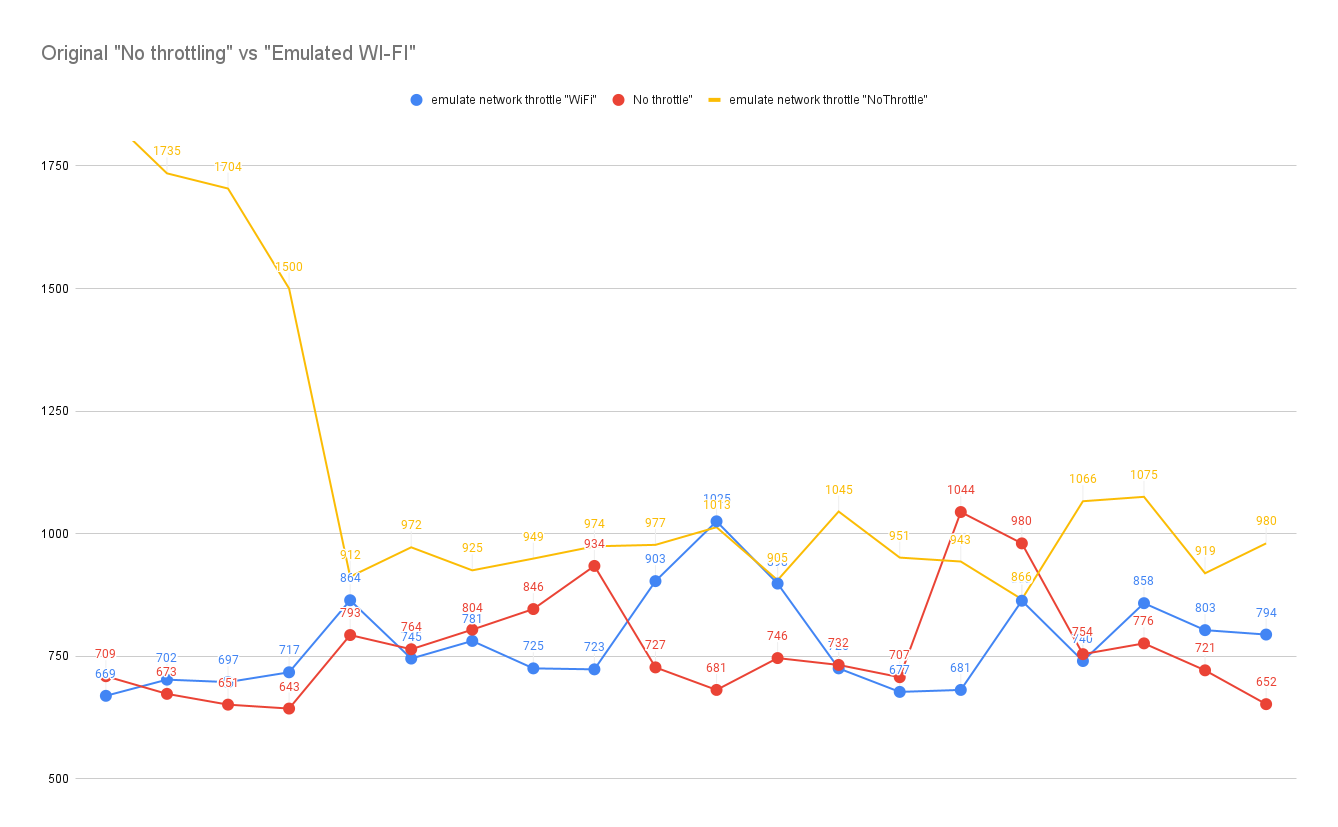
If there is an additional overhead of sending the CDP command, why the “WiFi” preset 8 out of 20 times was faster than the “No throttle” test? No throttle test use real network conditions, so it should be faster than the “WiFi” preset test, because the “WiFi” preset emulation should also add some overhead.
To provide you with more information, I also measured my real network speed using speedtest.net.

Just some food for thought. It might be interesting to investigate this issue further but it is out of the scope of this article.
You also can find the source code of this article on GitHub.
Thanks for reading!